Looking for HELP!

Just let me know if you have any problem related to my posts -- twitter: @ahsantasneem

This is default featured post 2 title

Go to Blogger edit html and find these sentences.Now replace these sentences with your own descriptions.

This is default featured post 3 title

Go to Blogger edit html and find these sentences.Now replace these sentences with your own descriptions.

This is default featured post 4 title

Go to Blogger edit html and find these sentences.Now replace these sentences with your own descriptions.

This is default featured post 5 title

Go to Blogger edit html and find these sentences.Now replace these sentences with your own descriptions.

Tuesday 30 November 2010

How To - Bridging GNS3 to a wireless NIC (linux and windows)

While poking around the new GNS3.net forum, I found two very interesting howto posts. Jeremy Grossman (gns3 author) describes the processes needed to bridge a wireless NIC to GNS3 using both Linux and Windows.
Here are the links:

Monday 11 October 2010

Multicast Stream – Tandberg MXP 990

Make sure that the PC is connected to the same LAN (or multi-cast enabled WAN) as the codec that is to be streaming

Note: The entire configuration related to my IP settings are erased or replaced with ‘X’. Please let me know if you face any problem, and keep following @ahsantasneem for more

Step 1: Static Public IP assignment, entering in all the IP fields for address, subnet mask, and gateway and DNS.


Step 2: Go to Endpoint Confiuration -> Streaming


Address: is defined as the IP-address of a streaming client, streaming server or a multicast address. Giving an address in the range 224.0.0.1-239.255.255.255 will broadcast the stream to any host that has joined the specified multicast group. Specifying normal broadcast address 255.255.255.255 will broadcast to any members on the LAN.

Address Port: If several codecs are streaming to the same IP-address, different ports have to be used in order for the client to know which stream to receive. In this case 22232

Source -> Auto: Enables streaming of both local and far end video. Selection of which site to be streamed is done using voice switching (the site that speaks is streamed).

Streaming Password : Set password so that only participants entering correct password will be able to view the streaming session. Entering a password will prevent unauthorized people from accessing the streaming session


Step 3: Click -> Overview -> Streaming and press the link “Start Streaming” to start the stream.

A new webpage is opened with the streaming view displayed within the page. You can also open your web-browser directly to the streaming page by entering this URL into the browser(In this case): http://124.x.x.x/stream.sdp where 124.x.x.x would be the IP of your streaming device (Tandberg mxp 990). If a streaming client is successfully installed on the computer, a window will start up and soon show the incoming streamed information as shown below:


Step 4: To receive the stream directly from within QuickTime Player, launch QuickTime
player, and under the File Menu select ‘Open URL’ and enter http://124.x.x.x/stream.sdp where 124.x.x.x would be the IP of your codec.

SDP file
When streaming, the codec will generate a SDP file 'stream.sdp' which can be retrieved through the codecs web-interface (by http). This file describes what type of media is used (G.711 / H.261) and which (multicast or unicast) address the streaming is sent to. The clients (QuickTime and RealPlayer) use this information to listen for the stream.


Step 5: To end the streaming session, just press the “Disconnect Call” button on remote control or click the ‘Stop Streaming’ icon on the web page provided the ‘Allow Remote Start’ is set to on.


Note: That just closing the web application will not end the streaming session, as other codec’s still might be able to receive the streamed information.

Supported Streaming clients
Cisco IP/TV, QuickTime version 4 or greater, RealPlayer version 7 and VIC
Cisco IP/TV http://www.cisco.com
QuickTime version 42 or greater http://quicktime.apple.com
VIC http://www-mice.cs.ucl.ac.uk/multimedia/software/vic/
RealPlayer7 or greater http://www.real.com


Thursday 7 October 2010

New Facebook 'Groups' Designed to Completely Change the Way You Use Facebook

Facebook has just revealed a new version of Groups at its live press conference in Palo Alto, California. Facebook Groups are a shared space where members can participate in communal activities like group chat, e-mail lists, document sharing and group photo-tagging.
The new Groups product was built from the ground up; Facebook Founder and CEO Mark Zuckerberg says Groups is an entirely new product that only shares the name in common with the old Groups functionality. The old Groups will continue to remain in place, but moving forward members will only be able to create new Groups.
Groups are closed by default (but can be secret or open) and are designed to be spaces where small groups of friends share information, with each group controlled by the entirety of its members — an important new direction for Facebook. The group chat feature is just as it sounds; members can participate in back-and-forth IM conversations with everyone in the group at the same time.
Once you start participating in Groups, the most-viewed ones will automatically live in the left-hand navigation of the page for easier access.
Facebook has also released a mobile interface and an Open Graph API for Groups, which means that soon Facebook Groups will be accessible in all imaginable capacities.
With everyone in control, Groups will function much differently than before. Facebook asserts that social norms will govern activity. Ultimately, the company believes the new Groups will fundamentally change the way you use Facebook and give you more control over the distribution of your messages.
From our initial tests, we can assert that Groups is, as Zuckerberg promises, something “so simple that everyone on the site will want to interact with it.” And, by design, everyone will use it.
As Facebook clearly stated during the press event, its goals are to map all real-world groups, to ensure that everyone participates and to build something useful in lots of contexts. What this really means is that Facebook wants to fully understand member relationships (an extension of its Open Graph undertaking), and that the company will use your behavior in Groups to better understand these relationships.

Wednesday 6 October 2010

Configuring Cisco Secure ACS for Windows PEAP-MS-CHAPv2 - [Part 2]

Configure the Wireless Network Connection

Complete these steps:
  1. Log off and then log on by using the WirelessUser account in the wirelessdemo.local domain.
  2. Choose Start > Control Panel, double-click Network Connections, and then right-click Wireless Network Connection.
  3. Click Properties, go to the Wireless Networks tab, and ensure that the Use Windows to configure my wireless network settingsis checked.
    peap-acs40-win2003-81.gif
  4. Click Add.
  5. Under the Association tab, type Employee in the Network name (SSID) field.
  6. Select WPA for the Network Authentication and ensure that Data Encryption is set to TKIP.

    /image/gif/paws/72013/peap-acs40-win2003-72.gif
  7. Go to the Authentication tab.
  8. Validate that EAP type is configured to use Protected EAP (PEAP). If it is not, select it from the drop-down menu.
  9. If you want the machine to be authenticated prior to login (which allows login scripts or group policy pushes to be applied) checkAuthenticate as computer when computer information is available.
    peap-acs40-win2003-83.gif
  10. Click Properties.
  11. As PEAP involves authentication of Server by the client ensure that Validate server certificate is checked. Also, make sure the CA that issued the ACS certificate is checked under the Trusted Root Certification Authorities menu.
  12. Choose Secured password (EAP-MSCHAP v2) under Authentication Method as it is used for inner authentication.
    peap-acs40-win2003-84.gif
  13. Make sure the Enable Fast Reconnect check box is checked. Then, click OK three times.
    Step - x : Select the option Configure and uncheck the option present there if you want to enter the user and password manually, and ignore the Step - x if you are already logged in with the correct user and password.
  14. Right-click the wireless network connection icon in systray and then click View Available Wireless Networks.
  15. Click the Employee wireless network and click Connect.
    peap-acs40-win2003-85.gif
    These screen shots indicate if the connection completes successfully.
    /image/gif/paws/72013/peap-acs40-win2003-86.gif
    peap-acs40-win2003-87.gif
    peap-acs40-win2003-88.gif
    peap-acs40-win2003-89.gif
  16. After authentication is successful, check the TCP/IP configuration for the wireless adapter by using Network Connections. It should have an address range from the DHCP scope or the scope created for the wireless clients.

    We have also configured the Cellphones (tested on Nokia N79 and Windows Mobile) to connect to the wireless router by adding the certificates on them, and now they are also able to authenticate through RADIUS Server. I'll post all the steps involved in it soon.

    Related Articles:

Configuring Cisco Secure ACS for Windows PEAP-MS-CHAPv2 - [Part 1]

Introduction
 I was working on improving and managing (logging) the security of my wireless network and for this purpose I was searching for steelbelted RADIUS which used to be a freeware, but recently I found that Juniper bought it and its no more freeware now. Therefore I started looking for an alternative and I found one that is Cisco ACS. My plan was to place RADIUS behind the wireless routers placed in my office and authenticate the users trying to connect to Wifi through RADIUS server preventing the unauthorized users access and also generate their logs. Below article helped me in the process I have also specified the changes done by me to make things work. The procedure mentioned below is for the workgroup environment not for the Domain environment.


Do let me know if you face any problem I'll be posting more on this soon keep following @ahsantasneem

[Contd..]


Both PEAP and EAP-TLS build and use a TLS/Secure Socket Layer (SSL) tunnel. PEAP uses only server-side authentication; only the server has a certificate and proves its identity to the client. EAP-TLS, however, uses mutual authentication in which both the ACS (authentication, authorization, and accounting [AAA]) server and clients have certificates and prove their identities to each other.
PEAP is convenient because clients do not require certificates. EAP-TLS is useful for authenticating headless devices, because certificates require no user interaction.

Network Diagram


This document uses the network setup shown in the diagram below.
/image/gif/paws/43486/acs-peap-01.gif

Obtain a Certificate for the ACS Server (Self-Signed Certificate)

The Self signed certificate will be valid for 1 year.


  1. Click System Configuration.
    /image/gif/paws/72013/peap-acs40-win2003-62.gif
  2. Click ACS Certificate Setup.
    /image/gif/paws/72013/peap-acs40-win2003-63.gif
  3. Click Install ACS Certificate.
    /image/gif/paws/72013/peap-acs40-win2003-64.gif
  4. Choose Read certificate file and type the location of the cert in my case it was c:\xxxx.cer

  5. Click Submit.
    peap-acs40-win2003-66.gif
  6. Click System Configuration.
  7. Click Service Control and then click Restart.
    peap-acs40-win2003-67.gif
  8. Click System Configuration.
  9. Click Global Authentication Setup.
  10. Check Allow EAP-MSCHAPV2 and Allow EAP-GTC.
    /image/gif/paws/72013/peap-acs40-win2003-68.gif
  11. Click Submit + Restart.
  12. Click System Configuration.
Follow these steps to restart the service and configure PEAP settings.
  1. Click System Configuration, and then click Service Control.
  2. Click Restart to restart the service.
  3. To configure PEAP settings, click System Configuration, and then click Global Authentication Setup.
  4. Check the two settings shown below, and leave all other settings as default. If you wish, you can specify additional settings, such as Enable Fast Reconnect. When you are finished, click Submit.
    • Allow EAP-MSCHAPv2
    • Allow MS-CHAP Version 2 Authentication
    Note: For more information on Fast Connect, refer to "Authentication Configuration Options" in System Configuration: Authentication and Certificates.
    /image/gif/paws/43486/acs-peap-15.gif

Specify and Configure the Access Point as an AAA Client

Follow these steps to configure the access point (AP) as an AAA client.
  1. Click Network Configuration. Under AAA Clients, click Add Entry.
    /image/gif/paws/43486/acs-peap-16.gif
  2. Enter the AP's hostname in the AAA Client Hostname field and its IP address in the AAA Client IP Address field. Enter a shared secret key for the ACS and the AP in the Key field. Select RADIUS (Cisco Aironet) as the authentication method. When you are finished, click Submit.
    /image/gif/paws/43486/acs-peap-17.gif

Configure the Linksys Wireless Router


And thats it, your Linksys wireless router is configured now with you Cisco ACS RADIUS server.

Related Articles
Configuring Cisco Secure ACS for Windows PEAP-MS-CHAPv2 - [Part 2]

Thursday 30 September 2010

Pemu – Pix Emulator with GNS3

The guys at GNS3.net have done it again! They just released version .04 of their incredible network emulation software. There are lots of new features including Pemu integration, c1700 and WICs Support and Project feature (you can keep router configs, nvram …).
Here is a full list of the new features:
  • A dynamic mode (no design/emulation modes)
  • A new .net save/load.
  • c1700 and WICS support.
  • PIX emulation.
  • Dynamips’s ATM bridge.
  • Capture feature for links from the GUI.
  • IDLE PC calculation from the GUI.
  • GUI improvements (save the window state when closing GNS3 …)
  • Annotation feature.
  • Project feature (you can keep router configs, nvram …)
  • NULL NIO support.
  • PDF export.
  • New languages.
I'll be posting more on this, keep following @ahsantasneem. Do let me know if you face any problem.

How To - Connect GNS3 to the internet in MacOSX

We have issued tutorials for connecting Windows or Linux to a physical network using gns3, but apparently, there is a little difference for MacOSX.  I recently received an email from one of our readers, Ivan Pletenev. Ivandescribes how to connect GNS3 to internet through wifi-interface in MacOSX. You will find his writeup below. Thanks Ivan!
To set up this connection we need to do 2 things:

  1. Connect MacOSX and GNS3 through loopback-interface
  2. Set up NAT in MacOSX

First of all, like blindhog.net says, we need to edit our GNS3 .net file. After that we will have something like this:

[localhost:3700]
workingdir = /Users/besch/tmp/gns3

[[3640]]
image = /Users/besch/Documents/Documentations/cisco/c3640-jk9o3s-mz.124-16a.bin
ram = 96
chassis = 3640


[[ROUTER R1]]
model = 3640
console = 2002
cnfg = /Users/besch/tmp/gns3/WLANRouter/R1.cfg
slot0 = NM-1FE-TX
f0/0 = nio_tap:/dev/tap0


[GNS3-DATA]
[[Cloud C0]]
connections = R1:f0/0:nio_tap:/dev/tap0

Now we need a loopback interface (tap0). Download and install tuntaposx program from http://tuntaposx.sourceforge.net/


After installing we can check that we have necessary devices by running ‘ls /dev’ command in the console window. If you have tap0..tap15 and tun0..tun15 in your listing, then everything is ok.

But we still don’t have the created tap interface.  To create tap0 interface all we need is just open our GNS3-project. But it has to be opened with root privileges. Execute this command in the console:

sudo chown root:wheel /Applications/GNS3.app/Contents/Resources/dynamips-0.2.8-RC2-OSX-Leopard.intel.bin

Now we can open our project. Then we need to set up our new tap0 interface:

sudo ifconfig tap0 10.100.100.100 netmask 255.255.255.0

The last thing – setting up router’s interface in GNS3 and checking connection:

R1#conf t
Enter configuration commands, one per line.  End with CNTL/Z.
R1(config)#int f0/0
R1(config-if)#ip address 10.100.100.101 255.255.255.0
R1(config-if)#no sh
R1(config-if)#exit
R1(config)#do ping 10.100.100.100

Type escape sequence to abort.
Sending 5, 100-byte ICMP Echos to 10.100.100.100, timeout is 2 seconds:
.!!!!


2 . Now let’s try to connect our R1 with internet. I remind you that we have an wireless connection (interface en1, ip 10.189.249.130). All what we need to do is to use NAT:
Lets check do we have IP Forwarding turned on?

sysctl net.inet.ip.fw.forwarding

If we’ve got 1 – it’s on, if 0 – then we have to turn it on:

sudo sysctl -w net.inet.ip.forwarding=1

The same thing for the firewall:

sysctl net.inet.ip.fw.enable

if we’ve got 0 – we need to turn it on:

sudo sysctl -w net.inet.ip.fw.enable=1

Now let’s run natd and add rule for firewall:

sudo natd -alias_address 10.189.249.130 -interface en1 -use_sockets -same_ports -unregistered_only -dynamic -clamp_mss

sudo ipfw add divert natd ip from any to any via en1


The last thing – setting up router’s gateway of last resort in GNS3 and checking connection:

R1#conf t
Enter configuration commands, one per line.  End with CNTL/Z.
R1(config)#ip route 0.0.0.0 0.0.0.0 10.100.100.100
R1(config)#do ping google.com

Type escape sequence to abort.
Sending 5, 100-byte ICMP Echos to 72.14.205.100, timeout is 2 seconds:
!!!!!
Success rate is 100 percent (5/5), round-trip min/avg/max = 148/184/220 ms


Friday 24 September 2010

Facebook Outage - Shown in Graph

ATLAS data to graph Facebook (AS32934) traffic with 80 ISPs around the world between 5pm September 22 and 5pm EDT today. You can see Facebook traffic plummet around 1:30pm and return shortly after 4pm. From a quick glance at the data, the outage appears to be global (impacting all of the 80 ISPs).


We have no information on the root cause (no sign of obvious BGP instability or DDoS).
Lots of speculation on twitter.


Related Articles
"Worst Outage in The History of Facebook" - Facebook Engineer Explains

"Worst Outage in The History of Facebook" - Facebook Engineer Explains

Facebook Software Engineering Director Robert Johnson was kind enough to explain to a curious public exactly why Facebook went down earlier today, calling the mishap “the worst outage we’ve had in over four years.”
In a brief blog post, Johnson discussed today’s downtime, which began around 11:30 a.m. PST. The site wasn’t functioning again for most users until around 3 p.m. PST.
Today’s outage was unrelated to another period of downtime yesterday, when issues with a third-party networking provider caused problems for some users trying to connect to Facebook.
Johnson said the downtime today was caused by “an unfortunate handling of an error condition” involving an automated system designed to verify configuration values in the cache and replace invalid values with updated values from the persistent store.

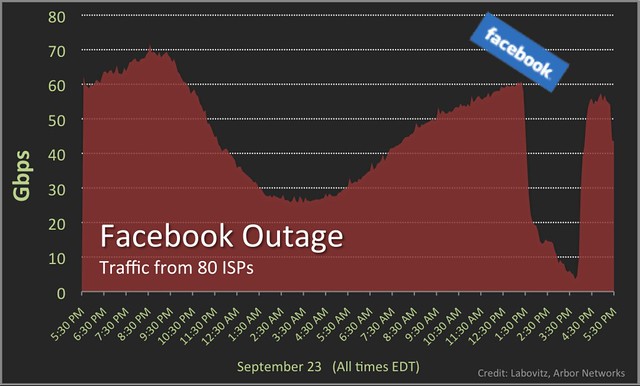
Today we made a change to the persistent copy of a configuration value that was interpreted as invalid. This meant that every single client saw the invalid value and attempted to fix it. Because the fix involves making a query to a cluster of databases, that cluster was quickly overwhelmed by hundreds of thousands of queries a second.
To make matters worse, every time a client got an error attempting to query one of the databases it interpreted it as an invalid value, and deleted the corresponding cache key. This meant that even after the original problem had been fixed, the stream of queries continued.
The automated system for correcting configuration values has been turned off for now, and Facebook is reportedly exploring more, ahem, “graceful” methods of handling this in the future.
Johnson also notes that getting the feedback loop to stop was “quite painful,” saying that the entire site had to be turned off to stop traffic to a particular database cluster.
We don’t envy Facebook the at-scale disaster the site has just survived; 500 million users and a feedback loop adds up to some nasty business however you slice it. And Facebook’s downtime problems aren’t nearly as persistent and severe as those of other social media staples out there.


Related Articles
Facebook Outage - Shown in Graph

Thursday 23 September 2010

How To - Make a DMG package from GNS3


This step-by-step procedure will show you how to make a DMG package from the GNS3 source code. I’ve built the package on Mac OS X Snow Leopard and used Py2app to make a Mac OS X application. Also, have a look at this article that really helped me.
This procedure worked for me, please let me know if you encounter any issue and I’ll update it. Also, please tell me if you can make it work on Mac OS X Leopard (10.5.x).

Setting up Python

First, install zlib library:
wget http://zlib.net/zlib-1.2.5.tar.gz
tar xzf zlib-1.2.5.tar.gz
cd zlib-1.2.5
.
/configure --64
make
make test
sudo make install
Compile and install the latest version of python:
wget http://www.python.org/ftp/python/2.6.5/Python-2.6.5.tar.bz2
tar xvjf Python-2.6.5.tar.bz2
cd Python-2.6.5
.
/configure --with-universal-archs=intel --enable-universalsdk=/ --enable-shared
make
make test
sudo make install

Setting up Qt and PyQt

Install Qt libraries:
To limit the DMG size, I compiled a minimum of components.
wget http://get.qt.nokia.com/qt/source/qt-everywhere-opensource-src-4.6.2.tar.gz
tar xvzf qt-everywhere-opensource-src-4.6.2.tar.gz
cd qt-everywhere-opensource-src-4.6.2
.
/configure -arch x86_64 -cocoa -no-dbus -no-cups -no-nis -no-openssl -no-scripttools -no-libtiff -no-libmng -no-script -no-javascript-jit -no-webkit -no-phonon-backend -no-phonon -no-audio-backend -no-multimedia -no-xmlpatterns -no-qt3support  -no-accessibility -opensource -no-dwarf2  -qt-libpng  -qt-libjpeg -no-multimedia -no-mediaservices
make
sudo make install
Install sip:
tar xvzf sip-4.10.2.tar.gz
wget http://www.riverbankcomputing.co.uk/static/Downloads/sip4/sip-4.10.2.tar.gz
python configure.py
cd sip-4.10.2
make
sudo make install
Install PyQt:
wget http://www.riverbankcomputing.co.uk/static/Downloads/PyQt4/PyQt-mac-gpl-4.7.3.tar.gz
tar xvzf PyQt-mac-gpl-4.7.3.tar.gz
cd PyQt-mac-gpl-4.7.3
python configure.py
-q /usr/local/Trolltech/Qt-4.6.2/bin/qmake
make
sudo make install

Setting up Py2app

Install setup tools:
wget http://pypi.python.org/packages/2.6/s/setuptools/setuptools-0.6c11-py2.6.egg
mv setuptools-0.6c11-py2.6.egg.sh setuptools-0.6c11-py2.6.egg
sh setuptools-0.6c11-py2.6.egg
Install macholib:
mkdir macholib
cd macholib
svn co http://svn.pythonmac.org/macholib/macholib/trunk/ .
python setup.py
install
Install a patched version of py2app with 64-bit support:
You will need to install mercurial if you haven’t already.
hg clone http://hg.hardcoded.net/py2app
cd py2app
python setup.py
install

Making the DMG package

Now you can download the source and make the DMG. If you are interested in the details, have a look at setup.py where you can find every instruction to tell py2app how to make an Mac OS X application from GNS3.
wget http://code.gns3.net/gns3-devel/archive/tip.tar.bz2
tar xvjf tip.tar.bz2
cd gns3-devel-xxx
wget http://downloads.sourceforge.net/gns-3/dynamips-0.2.8-RC2-OSX-Leopard.intel.bin?download
mv gns3 gns3.py
python setup.py py2app
If everything work, you should find the DMG the the dist directory.


Related Articles
How To - Run GNS3 on Mac OS X