Looking for HELP!

Just let me know if you have any problem related to my posts -- twitter: @ahsantasneem

This is default featured post 2 title

Go to Blogger edit html and find these sentences.Now replace these sentences with your own descriptions.

This is default featured post 3 title

Go to Blogger edit html and find these sentences.Now replace these sentences with your own descriptions.

This is default featured post 4 title

Go to Blogger edit html and find these sentences.Now replace these sentences with your own descriptions.

This is default featured post 5 title

Go to Blogger edit html and find these sentences.Now replace these sentences with your own descriptions.

Thursday 30 September 2010

Pemu – Pix Emulator with GNS3

The guys at GNS3.net have done it again! They just released version .04 of their incredible network emulation software. There are lots of new features including Pemu integration, c1700 and WICs Support and Project feature (you can keep router configs, nvram …).
Here is a full list of the new features:
  • A dynamic mode (no design/emulation modes)
  • A new .net save/load.
  • c1700 and WICS support.
  • PIX emulation.
  • Dynamips’s ATM bridge.
  • Capture feature for links from the GUI.
  • IDLE PC calculation from the GUI.
  • GUI improvements (save the window state when closing GNS3 …)
  • Annotation feature.
  • Project feature (you can keep router configs, nvram …)
  • NULL NIO support.
  • PDF export.
  • New languages.
I'll be posting more on this, keep following @ahsantasneem. Do let me know if you face any problem.

How To - Connect GNS3 to the internet in MacOSX

We have issued tutorials for connecting Windows or Linux to a physical network using gns3, but apparently, there is a little difference for MacOSX.  I recently received an email from one of our readers, Ivan Pletenev. Ivandescribes how to connect GNS3 to internet through wifi-interface in MacOSX. You will find his writeup below. Thanks Ivan!
To set up this connection we need to do 2 things:

  1. Connect MacOSX and GNS3 through loopback-interface
  2. Set up NAT in MacOSX

First of all, like blindhog.net says, we need to edit our GNS3 .net file. After that we will have something like this:

[localhost:3700]
workingdir = /Users/besch/tmp/gns3

[[3640]]
image = /Users/besch/Documents/Documentations/cisco/c3640-jk9o3s-mz.124-16a.bin
ram = 96
chassis = 3640


[[ROUTER R1]]
model = 3640
console = 2002
cnfg = /Users/besch/tmp/gns3/WLANRouter/R1.cfg
slot0 = NM-1FE-TX
f0/0 = nio_tap:/dev/tap0


[GNS3-DATA]
[[Cloud C0]]
connections = R1:f0/0:nio_tap:/dev/tap0

Now we need a loopback interface (tap0). Download and install tuntaposx program from http://tuntaposx.sourceforge.net/


After installing we can check that we have necessary devices by running ‘ls /dev’ command in the console window. If you have tap0..tap15 and tun0..tun15 in your listing, then everything is ok.

But we still don’t have the created tap interface.  To create tap0 interface all we need is just open our GNS3-project. But it has to be opened with root privileges. Execute this command in the console:

sudo chown root:wheel /Applications/GNS3.app/Contents/Resources/dynamips-0.2.8-RC2-OSX-Leopard.intel.bin

Now we can open our project. Then we need to set up our new tap0 interface:

sudo ifconfig tap0 10.100.100.100 netmask 255.255.255.0

The last thing – setting up router’s interface in GNS3 and checking connection:

R1#conf t
Enter configuration commands, one per line.  End with CNTL/Z.
R1(config)#int f0/0
R1(config-if)#ip address 10.100.100.101 255.255.255.0
R1(config-if)#no sh
R1(config-if)#exit
R1(config)#do ping 10.100.100.100

Type escape sequence to abort.
Sending 5, 100-byte ICMP Echos to 10.100.100.100, timeout is 2 seconds:
.!!!!


2 . Now let’s try to connect our R1 with internet. I remind you that we have an wireless connection (interface en1, ip 10.189.249.130). All what we need to do is to use NAT:
Lets check do we have IP Forwarding turned on?

sysctl net.inet.ip.fw.forwarding

If we’ve got 1 – it’s on, if 0 – then we have to turn it on:

sudo sysctl -w net.inet.ip.forwarding=1

The same thing for the firewall:

sysctl net.inet.ip.fw.enable

if we’ve got 0 – we need to turn it on:

sudo sysctl -w net.inet.ip.fw.enable=1

Now let’s run natd and add rule for firewall:

sudo natd -alias_address 10.189.249.130 -interface en1 -use_sockets -same_ports -unregistered_only -dynamic -clamp_mss

sudo ipfw add divert natd ip from any to any via en1


The last thing – setting up router’s gateway of last resort in GNS3 and checking connection:

R1#conf t
Enter configuration commands, one per line.  End with CNTL/Z.
R1(config)#ip route 0.0.0.0 0.0.0.0 10.100.100.100
R1(config)#do ping google.com

Type escape sequence to abort.
Sending 5, 100-byte ICMP Echos to 72.14.205.100, timeout is 2 seconds:
!!!!!
Success rate is 100 percent (5/5), round-trip min/avg/max = 148/184/220 ms


Friday 24 September 2010

Facebook Outage - Shown in Graph

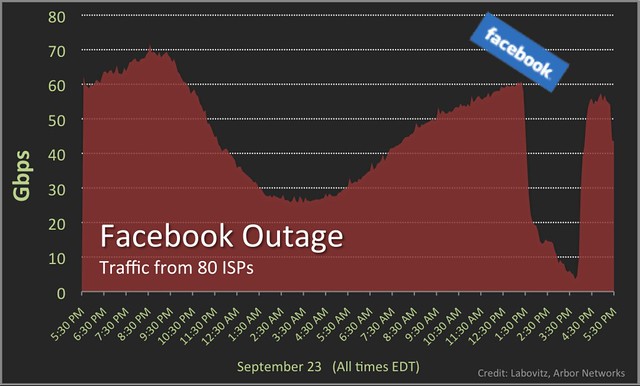
ATLAS data to graph Facebook (AS32934) traffic with 80 ISPs around the world between 5pm September 22 and 5pm EDT today. You can see Facebook traffic plummet around 1:30pm and return shortly after 4pm. From a quick glance at the data, the outage appears to be global (impacting all of the 80 ISPs).


We have no information on the root cause (no sign of obvious BGP instability or DDoS).
Lots of speculation on twitter.


Related Articles
"Worst Outage in The History of Facebook" - Facebook Engineer Explains

"Worst Outage in The History of Facebook" - Facebook Engineer Explains

Facebook Software Engineering Director Robert Johnson was kind enough to explain to a curious public exactly why Facebook went down earlier today, calling the mishap “the worst outage we’ve had in over four years.”
In a brief blog post, Johnson discussed today’s downtime, which began around 11:30 a.m. PST. The site wasn’t functioning again for most users until around 3 p.m. PST.
Today’s outage was unrelated to another period of downtime yesterday, when issues with a third-party networking provider caused problems for some users trying to connect to Facebook.
Johnson said the downtime today was caused by “an unfortunate handling of an error condition” involving an automated system designed to verify configuration values in the cache and replace invalid values with updated values from the persistent store.

Today we made a change to the persistent copy of a configuration value that was interpreted as invalid. This meant that every single client saw the invalid value and attempted to fix it. Because the fix involves making a query to a cluster of databases, that cluster was quickly overwhelmed by hundreds of thousands of queries a second.
To make matters worse, every time a client got an error attempting to query one of the databases it interpreted it as an invalid value, and deleted the corresponding cache key. This meant that even after the original problem had been fixed, the stream of queries continued.
The automated system for correcting configuration values has been turned off for now, and Facebook is reportedly exploring more, ahem, “graceful” methods of handling this in the future.
Johnson also notes that getting the feedback loop to stop was “quite painful,” saying that the entire site had to be turned off to stop traffic to a particular database cluster.
We don’t envy Facebook the at-scale disaster the site has just survived; 500 million users and a feedback loop adds up to some nasty business however you slice it. And Facebook’s downtime problems aren’t nearly as persistent and severe as those of other social media staples out there.


Related Articles
Facebook Outage - Shown in Graph

Thursday 23 September 2010

How To - Make a DMG package from GNS3


This step-by-step procedure will show you how to make a DMG package from the GNS3 source code. I’ve built the package on Mac OS X Snow Leopard and used Py2app to make a Mac OS X application. Also, have a look at this article that really helped me.
This procedure worked for me, please let me know if you encounter any issue and I’ll update it. Also, please tell me if you can make it work on Mac OS X Leopard (10.5.x).

Setting up Python

First, install zlib library:
wget http://zlib.net/zlib-1.2.5.tar.gz
tar xzf zlib-1.2.5.tar.gz
cd zlib-1.2.5
.
/configure --64
make
make test
sudo make install
Compile and install the latest version of python:
wget http://www.python.org/ftp/python/2.6.5/Python-2.6.5.tar.bz2
tar xvjf Python-2.6.5.tar.bz2
cd Python-2.6.5
.
/configure --with-universal-archs=intel --enable-universalsdk=/ --enable-shared
make
make test
sudo make install

Setting up Qt and PyQt

Install Qt libraries:
To limit the DMG size, I compiled a minimum of components.
wget http://get.qt.nokia.com/qt/source/qt-everywhere-opensource-src-4.6.2.tar.gz
tar xvzf qt-everywhere-opensource-src-4.6.2.tar.gz
cd qt-everywhere-opensource-src-4.6.2
.
/configure -arch x86_64 -cocoa -no-dbus -no-cups -no-nis -no-openssl -no-scripttools -no-libtiff -no-libmng -no-script -no-javascript-jit -no-webkit -no-phonon-backend -no-phonon -no-audio-backend -no-multimedia -no-xmlpatterns -no-qt3support  -no-accessibility -opensource -no-dwarf2  -qt-libpng  -qt-libjpeg -no-multimedia -no-mediaservices
make
sudo make install
Install sip:
tar xvzf sip-4.10.2.tar.gz
wget http://www.riverbankcomputing.co.uk/static/Downloads/sip4/sip-4.10.2.tar.gz
python configure.py
cd sip-4.10.2
make
sudo make install
Install PyQt:
wget http://www.riverbankcomputing.co.uk/static/Downloads/PyQt4/PyQt-mac-gpl-4.7.3.tar.gz
tar xvzf PyQt-mac-gpl-4.7.3.tar.gz
cd PyQt-mac-gpl-4.7.3
python configure.py
-q /usr/local/Trolltech/Qt-4.6.2/bin/qmake
make
sudo make install

Setting up Py2app

Install setup tools:
wget http://pypi.python.org/packages/2.6/s/setuptools/setuptools-0.6c11-py2.6.egg
mv setuptools-0.6c11-py2.6.egg.sh setuptools-0.6c11-py2.6.egg
sh setuptools-0.6c11-py2.6.egg
Install macholib:
mkdir macholib
cd macholib
svn co http://svn.pythonmac.org/macholib/macholib/trunk/ .
python setup.py
install
Install a patched version of py2app with 64-bit support:
You will need to install mercurial if you haven’t already.
hg clone http://hg.hardcoded.net/py2app
cd py2app
python setup.py
install

Making the DMG package

Now you can download the source and make the DMG. If you are interested in the details, have a look at setup.py where you can find every instruction to tell py2app how to make an Mac OS X application from GNS3.
wget http://code.gns3.net/gns3-devel/archive/tip.tar.bz2
tar xvjf tip.tar.bz2
cd gns3-devel-xxx
wget http://downloads.sourceforge.net/gns-3/dynamips-0.2.8-RC2-OSX-Leopard.intel.bin?download
mv gns3 gns3.py
python setup.py py2app
If everything work, you should find the DMG the the dist directory.


Related Articles
How To - Run GNS3 on Mac OS X